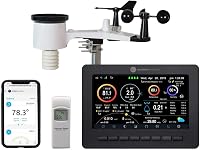
How to Set Up a Home Weather Station
To set up a home weather station, mount the sensor array in open air, well away from walls and heat, then pair the console and connect it to Wi-Fi. Clear ground, correct height and a stable power supply matter more than the brand you buy.
On this page (8 sections)
- What do you need before you start setting up?
- Where should you put the sensors for accurate readings?
- How do you mount a home weather station securely?
- How do you connect the sensor array to the console?
- How do you get the station onto Wi-Fi and your phone?
- How do you check and calibrate the readings?
- What power setup keeps a station running through winter?
- Which station and setup should you start with?
To set up a home weather station, mount the sensor array in open air away from walls and heat, then pair the indoor console and connect it to Wi-Fi if you want remote readings. Placement decides whether your numbers are useful, so spend most of your effort there.
The steps below cover choosing a spot, mounting the sensors, linking the console and checking the readings. Once you know how to set up a home weather station properly, the data stays accurate for years.
What do you need before you start setting up?
Gather the station, its mounting hardware, batteries and a phone or laptop before you climb anything. Check the box contents against the manual so a missing bracket doesn't stop the job.
A typical kit includes the sensor array, the indoor display and an AC adapter. The Ambient Weather WS-2902 ships with the Osprey sensor array, a color LCD console, an adapter and a user manual.
You'll also want a mounting pole or tripod. The sensor array clamps to any pole between 1.25 and 2 in diameter using its U-bolt bracket.
Many kits leave the pole out, so buy or borrow one first.
Batteries are often separate. The WS-2902 takes 3 AAA cells as backup for the solar panel.
Lithium cells handle cold and heat better than standard alkaline.
Where should you put the sensors for accurate readings?
Put the sensor array in open air, clear of buildings and trees, so wind and rain reach it from all directions. A spot above a lawn or garden beats a wall, a fence or a hot roof surface.
Wind readings need the most clearance. A rule of thumb is to mount the wind sensor about four times the height of the nearest obstruction away from it.
A 20 ft tree means roughly 80 ft of open space for clean wind data.
Temperature and rain sensors have their own needs. Keep them at least 5 ft from any heat source such as a building wall or paving.
The rain funnel also needs to sit level and free of overhangs.
Avoid spots where sprinklers, gutters or roof runoff hit the array. A downspout aimed at the rain cup will inflate your totals every storm.
How do you mount a home weather station securely?
Mount the array on a rigid pole or tripod, tighten every joint and check it's level before the first reading. A wobbling mast adds false wind gusts and can tip in a storm.
Mounting height matters most for wind. Aim for about 33 ft (10 m) in open air where you can, or as high as your roof safely allows.
Many homeowners use a roof mast or a sturdy tripod on flat ground.
The tripod approach suits gardens and flat roofs. The Ambient Weather EZ-48 tripod and mast assembly stands 53 in tall with the supplied mast and has a 33 in base.
Its 18 gauge steel tubing is galvanized for corrosion protection.
Set the tripod on firm, level ground or straddle the apex of a pitched roof. Ambient Weather sells optional ground stakes and a rooftop pad kit, so plan your base type before installing.
The anemometer pictured with the tripod is not included.
Check the pole diameter against your sensor bracket. The WS-2902 fits poles from 1.25 to 2 in, so a matching mast keeps the clamp snug without shims.
How do you connect the sensor array to the console?
Power the console, then let it pick up the sensor signal, usually within a few minutes of switching both on. The sensor array sends data to the console by radio at 915 MHz, separate from Wi-Fi.
Start with the console on its AC adapter and the sensor array powered by its solar panel plus backup batteries. Keep the console within radio range while you pair them.
The WS-2902 reaches up to 330 ft in open air, though walls and metal cut that to around 100 ft in most homes.
If the console shows no outdoor data, move it closer and press the search or sync button the manual describes. Solid metal, earth and ground block the signal, so keep the path as open as you can.
Once paired, the console shows wind speed and direction, rainfall, temperature, humidity, UV and solar radiation, plus barometric pressure. Check each field reads something sensible before you move on.
How do you get the station onto Wi-Fi and your phone?
Connect the console to your 2.4 GHz Wi-Fi network using the station's setup app or its on-screen Wi-Fi menu. The WS-2902 uses 2.4 GHz, so a 5 GHz-only network won't work without a 2.4 GHz band.
Follow the app's prompts to join your network and create or sign in to the weather network account. The station can then send readings to the Ambient Weather Network and to other online weather services.
Wi-Fi adds remote viewing, alerts and smart home links. The WS-2902 works with IFTTT, Google Home and Alexa for alerts and automation, so you can trigger a reminder when rain or high wind arrives.
This step is optional; the console reads fine without a network.
If the Wi-Fi setup fails, check the password and confirm your router runs a 2.4 GHz band. Move the console closer to the router during setup, then return it to its spot.
How do you check and calibrate the readings?
Compare your numbers with a nearby official station and with a handheld check, then adjust only when there's a clear gap. Most stations are accurate out of the box, so resist tinkering in week one.
Rain gauges are the usual culprit. Confirm the funnel is level and clear, then compare a storm total with a rain gauge you trust.
Some consoles let you enter a rain calibration offset, and the manual explains where.
Temperature reads high when the sensor sits near a wall or paving. Move it rather than applying a big correction.
Wind direction needs a north reference, so aim the array's alignment mark north using a compass.
Give a new station a day or two to settle before judging it. Then read how a home weather station works to understand what each sensor measures and where small errors creep in.
What power setup keeps a station running through winter?
Rely on the solar panel in daylight and fit good batteries for backup, so the array keeps reporting through dark, cold spells. Cold weather drains ordinary cells faster than lithium ones.
The WS-2902's primary power is a solar panel charging a super capacitor, with optional battery backup. Batteries are not included, so fit a set before winter.
Lithium cells are the safer backup in a cold climate. Energizer says its Ultimate Lithium AA batteries work from -40F to 140°F and hold power up to 25 years in storage.
That range covers a hard freeze better than alkaline.
Check the battery count first. The WS-2902 needs 3 AAA cells, so match the size your model lists.
Swap backup batteries before the coldest months rather than waiting for a low-battery warning.
Keep the solar panel clean and unshaded. A panel under a tree canopy or thick snow won't charge the capacitor, and the array leans on its batteries until the sun returns.
Which station and setup should you start with?
For a first station, the Ambient Weather WS-2902 gives you a complete solar-powered array, a color console and Wi-Fi sharing without extra sensors. It covers wind, rain, temperature, humidity, UV and solar radiation in one kit.
Pair it with the EZ-48 tripod if you need a stable mast on flat ground or a roof. Add lithium batteries so the backup survives winter.
That trio covers the mounting, pairing and power steps in this guide.
If you only want indoor temperature and pressure, a simpler display unit is enough. Readers who want app control and multiple sensors can compare smart weather station options before buying.
Once your station is running, a shortlist of the best weather stations for a home helps you plan an upgrade. Start simple: get the placement right, and how to set up a home weather station becomes a one-afternoon job you won't need to redo.
Frequently asked questions
How high should I mount a home weather station?
Wind sensors work best at about 33 ft (10 m) in open air, and rain and temperature sensors sit lower, around 5 ft. A roof or a tall mast gets you closest to that.
Keep the whole array clear of trees and buildings.
Does a home weather station need Wi-Fi?
No. The sensors talk to the indoor console by radio, so you get readings without any network.
Wi-Fi only adds remote viewing and sharing to online weather networks.
You can set it up offline and add Wi-Fi later.
How far can the sensors be from the console?
The Ambient Weather WS-2902 sensor array sends its signal up to 330 ft in open air. Walls, metal and ground cut that range, so expect closer to 100 ft in a typical house.
Keep the console within that distance.
What batteries does a home weather station use?
Many stations, including the Ambient Weather WS-2902, take AAA batteries as backup for the solar sensor array. Lithium cells handle cold and heat better than standard alkaline.
Check your model's battery count before you buy.
Why is my weather station giving wrong readings?
The usual cause is placement. A sensor near a wall, on hot paving or in a rain shadow reads too warm or catches too little rain.
Move it to open grass or a clear mast and give it time to settle.